
Introduction
My goal with this project was to create the ultimate secure pc for two main purposes maintaining good op-sec online and preventing unauthorised pythical access to the device with the least possible paper trail all.
Also after doing this project I noticed the surprising lack of decent resources on librebooting a x220 so hopefully this helps consolidate the information a little bit easier
Project threat model
This segment is going to be split up into a few segments regarding physical and legal parts of this threat model.
Obviously the phrase ultimate secure pc depends on if your Ross Ulbricht or your nan who just wants to go on "the Facebook". Before we get to actually securing the PC, this project's threat model needs to be discussed because there's no point going overkill or making something usable because the user doesn't know how to properly use a tool or software, which makes mistakes more likely and mistakes equal knocks at the door.
This project's threat model was based on a technically savvy user defending against law enforcement (LE) for a few reasons:
- It's the area I'm interested in so why wouldn't I?
- It's the most realistic, regardless of if you're a discriminated group, journalist or criminal you would likely be trying to avoid law enforcement.
- Most of my research focuses on defending from a LE threat.
We know what we're defending against, we can figure out how to actually defend against it.
Legal aspects
Due to where I live, a major factor to be considered in my personal threat model is CCTV as that can ruin all your fun before it's even started, since all LE need to request specific CCTV footage is a legitimate interest and a condition for processing which is extremely broad and boils down to three points:
- Purpose (are you doing it for a legitimate reason?)
- Necessity (do you need it?)
- Balancing (do you want it more than you need it?)
Thanks to article 6(1)(f) of the UK GDPR and schedule 1 of the Data Protection Act 2018, all LE are required to request certain parts of a CCTV recording.
Equipment needed
One of the very few positives of the recent Covid-19 pandemic is that wearing a mask is perfectly socially acceptable which is great for our case of buying a laptop because if you pair it with common clothes e.g. black hat,black jacket and jeans, its a such a broad description that basically renders it pointless.
I paid about £60 in cash (naturally) for a complete x220 thinkpad from a second electronics shop and Is almost perfect for our needs since it has removable wifi and bluetooth modules the only downside being the intel management engine can't be completely removed which isn't perfect but it can be we work with what we got.
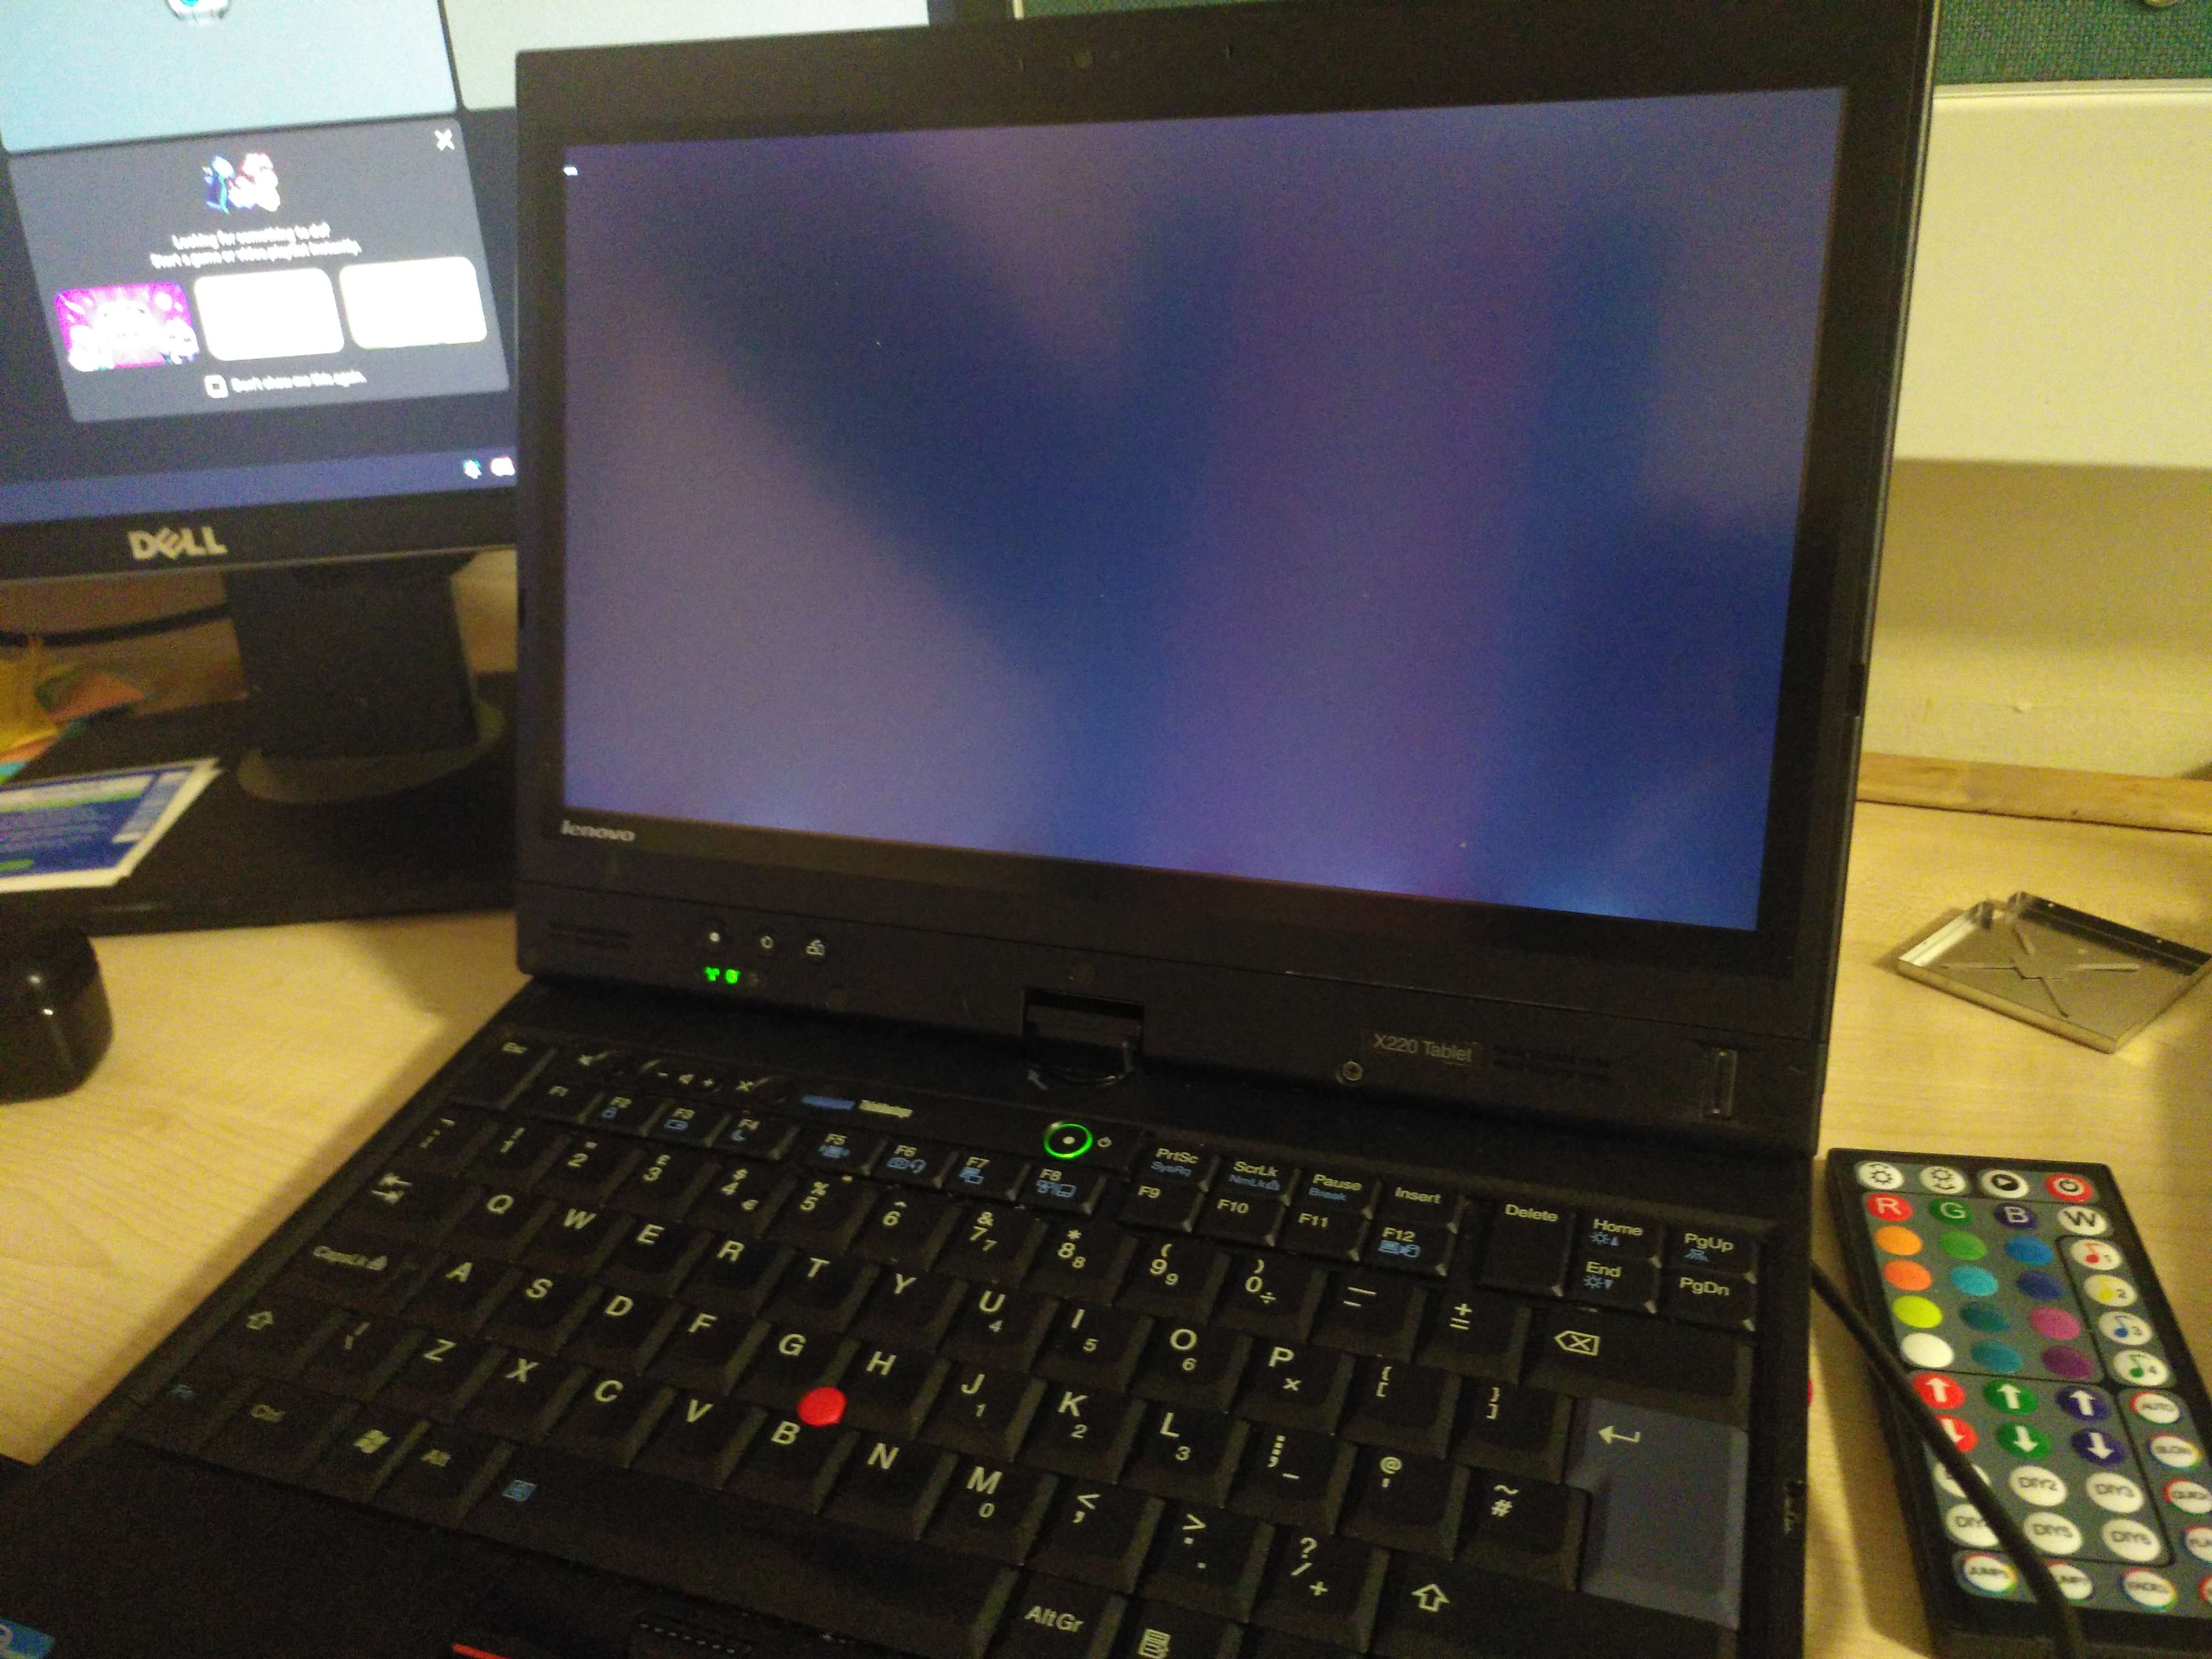
figure 1- image of the x220 thinkpad
Management problems
Depending on how big your tinfoil hat is, you may know that pretty much every chipset since 2008-2013 has “backdoor” in the form of either the intel management engine(intel ME) or AMD's slightly less catchy Platform Security Processor. Which to cut a long and very nerdy conversation short has complete access to a device even when it its powered off.
While expect purpose is unknown and very depended on who you ask but they go to great length to make sure its kept this way. But what we do know is it is a completely separate processor running MINIX based OS that has complete ring 0 access to the device even when it is powered off and is based or at least shares a lot with their business line of Active Management Technology which is able to turn a device on or off, wipe it, configure it, all the good stuff we do not want in a Op-sec aware pc.
So the question remains how can this be removed and why did I waste a week wandering around second hand shops?
Librebooting and a complete lack of self restraint.
The intel management engine can't be disabled completely without the device shutting it self off every 30 minutes due the management engine checking the firmware signature, and there is currently no practical way of skipping this verification check through means such as voltage glitching the chip as the signing introductions are executed in order to skip over them. Instead the project has to put on a puppet show with the "netured" remains of the management engine in order to pass the signature check. And prevents the laptop from turning off after 30 minutes. Or to put it another way.

figure 2- the goal of libreboot
The libreboot project is a subset of the coreboot porject which aims to make peoples bios, more open and secure, libreboot takes this a step further and removes every propriety "blob" of code from a coreboot build and provides that so, people do not have to manually remove all the blobs themselves. That is the main different between the two projects, since libreboot is like a distribution of coreboot similar to how you have distributions(distro) of Linux, while each distro is completely different they all are based on the same Linux kernal. So if you explain one you kind of explain them all, hence the extremely small segment on the main focus on the project.
Having a prebuilt image where everything out in the open is great for a privacy enthusiast like me but not so great for the local alphabet bois.
Flashing
So now every part of project has been explained we can accaility get to the practical part of flashing the new BIOS onto the X220 thinkpad. In order to do this flashing you need
• supported device in my case the X220 but there are a lot of different devices supported either by coreboot or libreboot.
• A SOIC-8 clip with wires under 10cm
• a raspberry pi or begal bone black (I used a PI model 3B+)
• flashrom
• me_cleaner
• ifdtool
here how you connect a raspiberry pi 3 model b+ to the BIOS chip of a thinkpad X220 it varies depending on what type of devices you have. with.
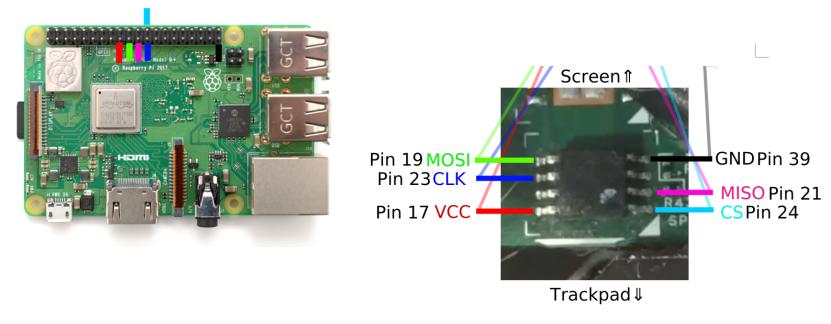
figure 3- wiring diagrams
/p>
I should note there has been some consensuses about telemetry from mircosoft packages installed on Raspberry pi NOOB'S OS but doesn't effect the flashing process, just a possible privacy issue if you intent of updating the OS before you begin.
The slight issue here in this hypothetical situation where we try and do this leaving as little trail as possible is I already had the tools for reading and writing from the previous project I did, I wrote about it and posted it here as well How I dumped a N833 router firmware
worth a read if your interested.
I don't know how you would get these tools without leaving a paper trail so that one part I will admit defeat on.
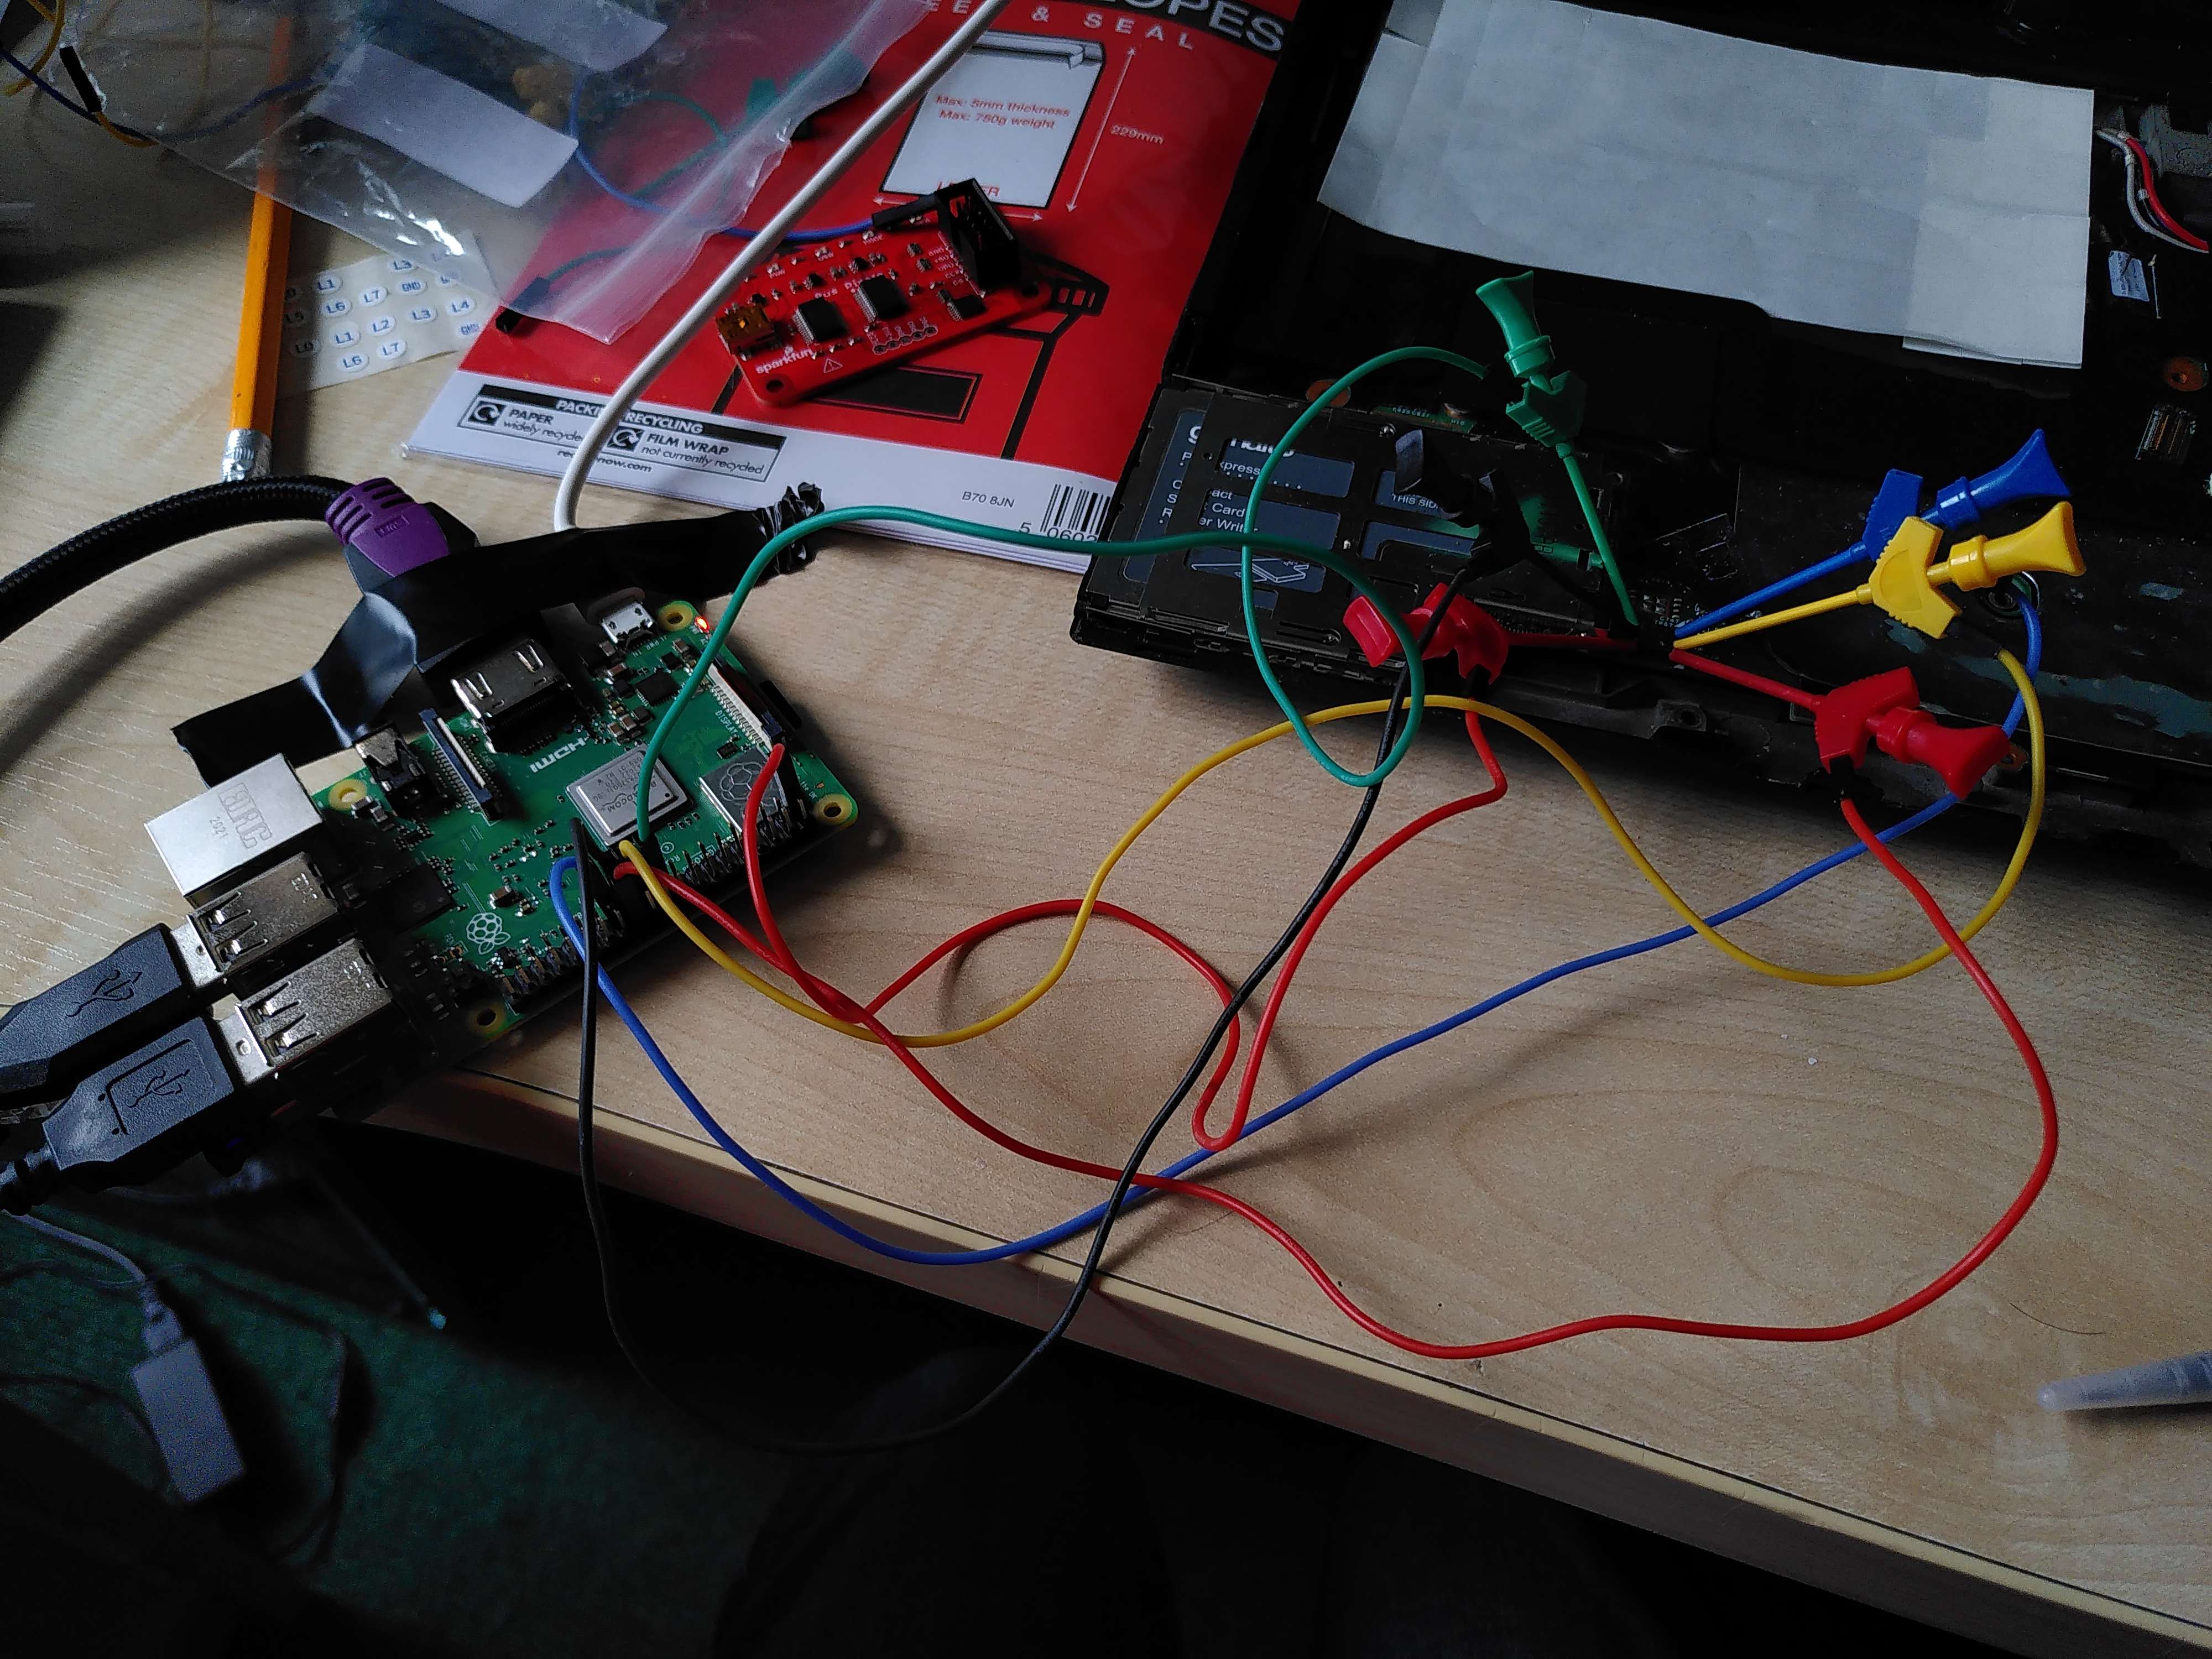
figure 4- This was my original set up I did try using a bog standard soic clip
What you gonna do with all those dumps inside your trunk?
I should note that if your solely planning on librebooting this segment is purely for a backup in case something goes wrong. You do not need the dump the BIOS to libreboot since its a pre built coreboot image, that requires nothing from the device itself.
Skip to the bottom of this section if your not interested in coreboot.
here the command for identifying the chips through flashrom on a raspberry pi
this uses flashrom with and sets the programmer with -p with the Linux native spi driver at the location the device is connected to on the OS, with the spidev which is how the pi handles spi, then sets the clock frequency to 512 kilohertz.
If your doing this on a device with only one bios chip like I am you should notice there are two chips detected you properly want the first one, I believe the second one is the management engine and is write protected, that,remember this because I sure didn't so I spent 20 minutes trying to read and write too because I can't take my own advice on two separate occasions.

figure 5- identifying the chips
Remember to note down the size of the chip in my case being(8192kb) or 8mb will be important when selecting the correct build or building our own later.
So initially I couldn't get it to dump correctly, and every time I would get a different sha1 output every time and I couldn't for the life of me figure out why at times like this I like to rely on a problem solving tool I created the three E's
• experience
• experimentation
• expletives
After heavily relaying on the third e in particular, I remembered a lower SPI speed tends to get a more stable but slower connection, and it worked at a speed of 512, it properly works on a higher speed but that's what worked for me.
Heres the command for dumping the x220 from the Raspberry pi
It's the same as the previous command expect we are now using -r to read the contents to a file called dump1.bin
I created three different dumps of the bios each with a different number just to make sure it was dumping correctly.
then use sha1sum dump*.bin to calculate the sha1 hashes of every file in the directory with the name dump what ever character here.bin then display them on the terminal to compare them.

figure 6- comparing hashes
This is a earlier screen shot so only two are present.
If you have any errors try the following(simplest to most complex)
• lowering the spi speed
• turning everything off and on again
• reseating the connectors on both sides
• having a break and something to eat
• using cables under 10cm(mine were oversized cheapo Amazon ones but worth a try according to the documentation)
now the we have a copy of the bios we can remove as much of the intel management engine as possible with ME cleaner using the following command
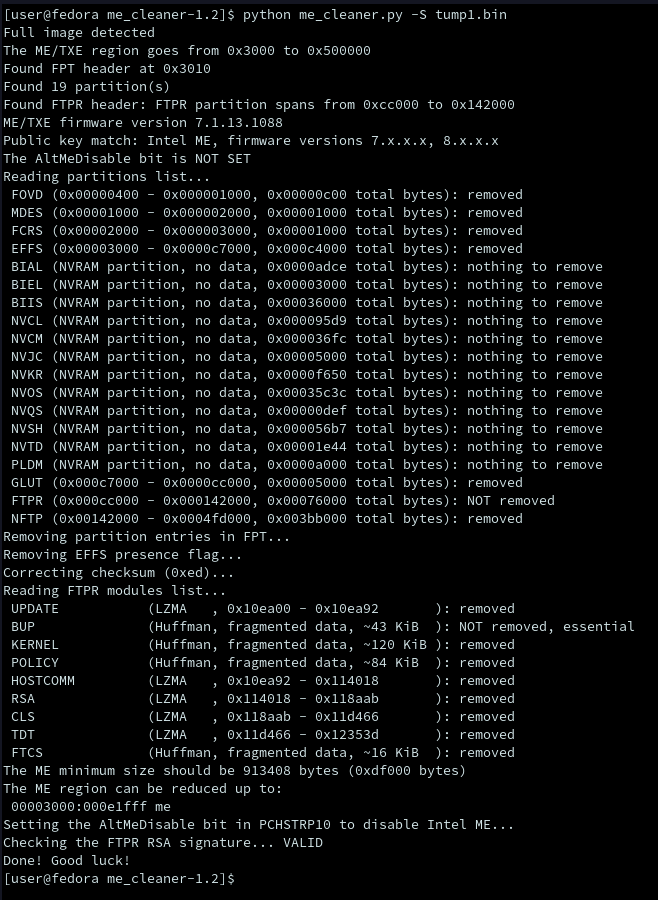
figure 7-me cleaner
then we can separate the image into multiple segments since we don't need everything by using ifdtool with the command .
The -x of this extracts the image file directories which are text based versions of the image file in order to easily modify and read the image file like so

figure 8- screenshot of ifdtool being used
that is all sorted we can final get down to the core matter by downloading it via git using the command
git clone --recursive https://review.coreboot.org/coreboot.git ~/coreboot
this pulls everything we need to do with coreboot and saves it in my case to a folder called coreboot in my home directory.
Slight foreshadowing of future problems here but make sure you download the VGA BIOS as well since without it you won’t get a image on certain OS, like windows or certain linux distros.
Before we start building our image we need to satisfy a couple of dependencies by installing a few thing here is the version for fedora or the DNF package manager since that what I use.
• git:
• gnat:
• flex:
• bison:
• ncurses-devel
• wget:
• zlib1g-dev:
• gcc-c++
• make sure to groupinstall "Development Tools".
If your using a different package manger the names will differ, I normally just chuck them into chatgpt and it gives me the correct package names.
Building a coreboot image
To start building a coreboot image first we need to change directory to the one you downloaded coreboot into early then run the command
which if you have all the dependences satisfied should look like this
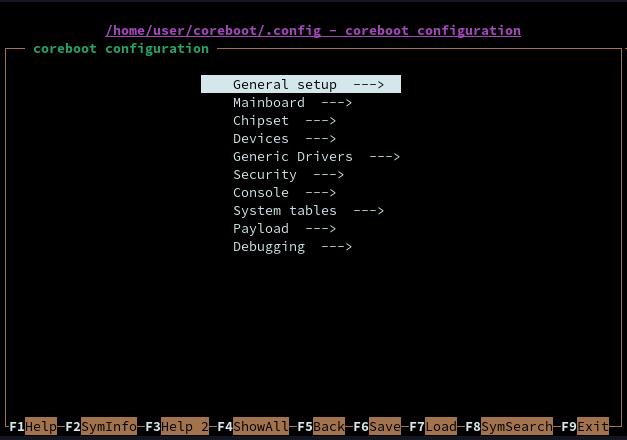
figure 9-coreboot image builder main menu
Im not going to cover each one will leave a copy and paste a link of the ones needed according to the internet.
General setup
- Compress ramstage with LZMA
- Include coreboot .config file into the ROM image
- Allow use of binary-only repository
Mainboard
- Mainboard vendor (Lenovo)
- Mainboard model (Thinkpad X220)
- ROM chip size (8192 KB (8 MB))
- (0x100000) Size of CBFS filesystem in ROM
Chipset
- Enable VMX for virtualization
- Include CPU microcode in CBFS (Generate from tree)
- Flash ROM locking on S3 resume (Don't lock ROM sections on S3 resume)
- Add Intel descriptor.bin file
- (3rdparty/blobs/mainboard/$(MAINBOARDDIR)/descriptor.bin) Path and filename of the descriptor.bin file
- Add Intel ME/TXE firmware
- (3rdparty/blobs/mainboard/$(MAINBOARDDIR)/me.bin) Path to management engine firmware
- Add gigabit ethernet firmware
- (3rdparty/blobs/mainboard/$(MAINBOARDDIR)/gbe.bin) Path to gigabit ethernet firmware
Devices
- Graphics initialization (Run VGA Option ROMs)
- Use native graphics initialization
- Add a VGA BIOS image
- (/home/$USER/vga-8086-0126.bin) VGA BIOS path and filename
- (8086,0126) VGA device PCI IDs
Generic drivers
- PS/2 keyboard init
- Support Intel PCI-e WiFi adapters
Console
- Squelch AP CPUs from early console.
- Show POST codes on the debug console
Compiling
Also a interesting one in the payloads section you can chose coredoom which replaces the standard payload such as seabios or grub with the original doom since it really can run on anything.
a i386 cross compiler is needed also needed due to certain elements of coreboot using that architecture.
two commands are all it takes.
to compile everything you simply run
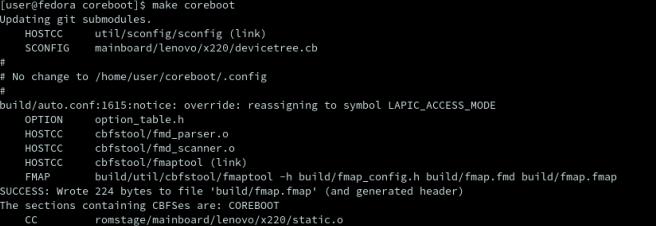
figure 10- make coreboot command output
depending on how fast your machine is this might take awhile so go take a break and get a drink.
Now the simplest but scared part can be done the actually flashing
if you read from the bios chip to either build your own coreboot image or just as a backup, you can just use - a
if you didn't may I suggest rubbing raw onions in your eyes since you clearly enjoy torturing yourself, and once your vision has recovered scrolling up to the section where I covered the reading the chip.

figure 11- writing to the bios chip(ignore the chip I am writing to here it was the suppose to be the other one.)
All being well being well it should now have worked and the device should now be using the libre/coreboot if it doesn’t theres always the raw onions, or checking if you installed the VGA BIOS part correctly.
Software
Now the hardware is in a known good state, the attention can be turned to software. The same requirements apply to the software, such as open, reviewed, secure.
Being the huge privacy nerd I am,most of these resources I already knew about so that cut down on the research of resources such as darknet marketplace bible(DNM bible) from /d/opsec on dread, Extreme privacy by Michael bazzell. also the whonix wiki very useful, I will put the links to all of these at the end of the post.
All these basically boil down to
1. Don't be a idiot(*cough Conor Brian Fitzpatrick)
2. Your going to get caught at some point its just a matter of time
3. If you done the slightest bit of research your ahead of most.
4. Keep your lives completely separate( don't mention anything to anyone)
Since extreme privacy focuses more on mobile devices than laptops I will mainly be using the DNM bible as a guide. Also in this hypothetical using any goggle service to research this stuff is instantly game over since Google collects lots of data and happily complies with law enforcement, I presume the same goes for the book.
Choice of OS's
So there's a few different “opsec aware” operating systems that range from simple plug and play live boots all like tails all the way up to requiring certain hardware and having to be set up by the user, like Whonix/Qubes.
Whonix/Qubes was chosen since its apparently the most secure and is the most interesting, The DNM bible makes it out to be some super complex tasks only the most "E1Te H4CK0rS" can do but if you have installed linux before then your fine.
The best way to think of this Whonix/Qubes is as a stack of virtual machines with each one sandboxed from the others and responsible for a different areas of a typical OS as shown in the image below,
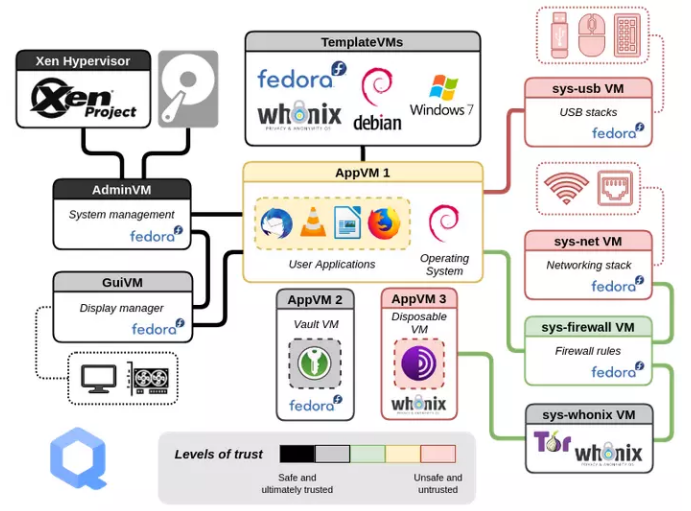
figure 12- overview of how Whonix/Qubes works
but a easier way of showing it is
• xen
• qubes
• whonix gateway(tor)
• whonix workstation(debian based)
• template(debian,kicksecure,fedora,arch)
The Xen hypervisor and Qubes handle the virtualion with all internet traffic being routed through the whonix gateway over tor and the whonix workstation is base desktop with the templates the ones being selected from the drop down menu in the image.
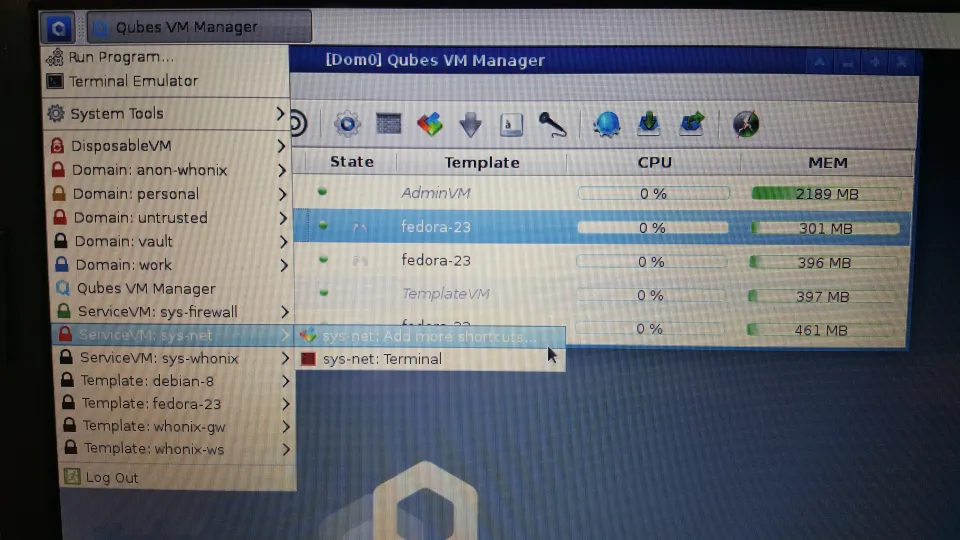
figure 13- whonix desktop
Tails
Now for our less technically literate readers Tails maybe a better option since it is basically plug and play you download the tails ISO
verify the checksum via step three of the download page to make sure it hasn’t be tempered with
• then write it to the pen drive
• set the device to boot from a pen drive
• Plug the pen drive into the device
•wait for it to installed
• remove the usb stick and restart
•all sorted to do as you please.
This segment is going to be broken down into The three biggest unadressed areas in our threat model which are
• storing credentials
• communication
• keeping it completely separate from my own life
This is where the The DNM bible is particularly useful, since its focuses more of the software side of privacy and maintaining good opsec.
Tools of the trade
Everyone knows that you should have a "complex" and uquine password for each of your accounts but the trouble is remembering especially if you can't use anything related to your real life.
That's where password managers come in, more specificly keepassxc which ticks all of our boxes and some since its
• free and open source
• the tool got audited/reviewed on the 15 of April 2023(last month at the time of writing)
• completely offline
• preinstall on qubes whonix
• community support and trusted
all these makes it perfect for sorting everything from login information,cyrpto seed phrases,PGP keys. It can also serve SSH keys, through the use of KeeAgent.
The only possible down side is that you have to create a singular master password of at least eight words that you need to remember outside of keepass while you can chose to use a keyfile or a physical access token but if a attacker gains access to your device its game over for your credentials and basically defeats the purpose of securing it if anyone can access it.
As for the creating the password keepass has that covered too with a little dice icon on the first row which randomly generates a password for you, that you customise what's in it how long it should be all that fun stuff.
When copying credentials keepass will clear your clipboard after 10 seconds, which is useful should you forget to do that, not that it will stop a credentials/cyrpto stealer malware you may on your system.
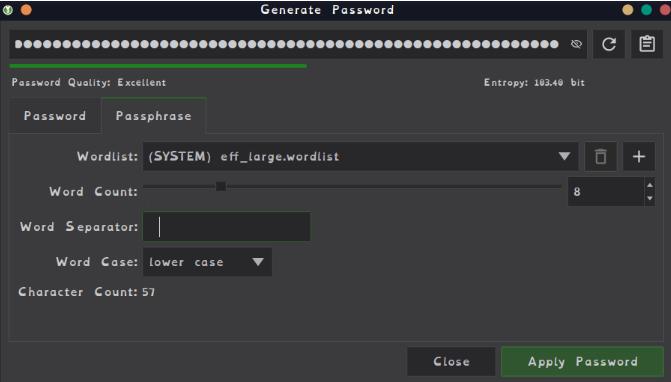
figure 14- keepassXC password genarator
Note
if your using tails make sure the database is saved to the persistence volume otherwise it will disappear when you reboot.
Just remember if your attacker is anyone other than Law enforcement this comic applies
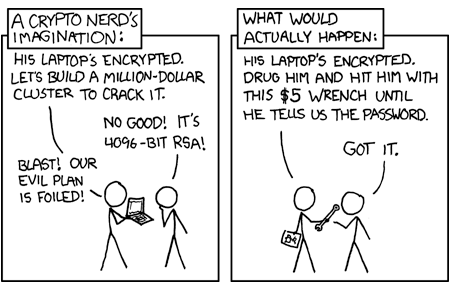
figure 15- XFCD comic about crypto nerds
Communication
The predominant way of ensuring any sensitive information remains secure is through use of pretty good privacy(PGP) which uses a two key system to ensure the only two people who can read the message are the sender and the receiver.
Im not going to go into the details of it because cryptographic makes me want to repeatedly jump up and down on Lego. But the basics of the system are
1.You get two different keys
a public one and a private one
2.You send the public key to the other person they then sign the message with said key
3.they send the now encrypted message back
4.you then decrypt the message with your private key
that's a very brief overview of the whole thing but basically all that matters for our needs.
Now we know how we can talk securely but how you do this. Well if your on whonix super simple just a couple of commands if your on tails as simple as opening up kleopatra which should be stored under accessories then file, New key Pair and following from there remembering to go to advanced settings and change the amount of bits from 3072 to 4096. and set the key experity date to 1 years in the future just so you regularly rotate your keys and limits how much sensitive information each one holds.
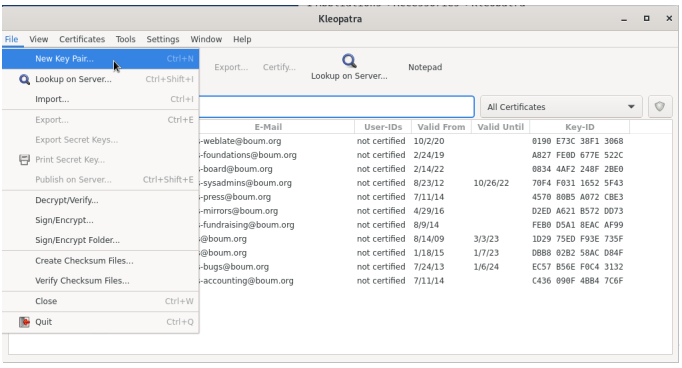
figure 16- Kelopatra menu
Whonix/Qubes users
simply open up a terminal in which ever vm your using for this segment then run the following commands
1 (to select RSA and RSA) keys
4096 (to select the amount of bits that will be used)
select how long you want the keys to last for (normally 1 years)
enter a name( not your real name)
a email but this can be skipped by pressing enter
any comments you want
after checking everything is correct press o
it should look like this
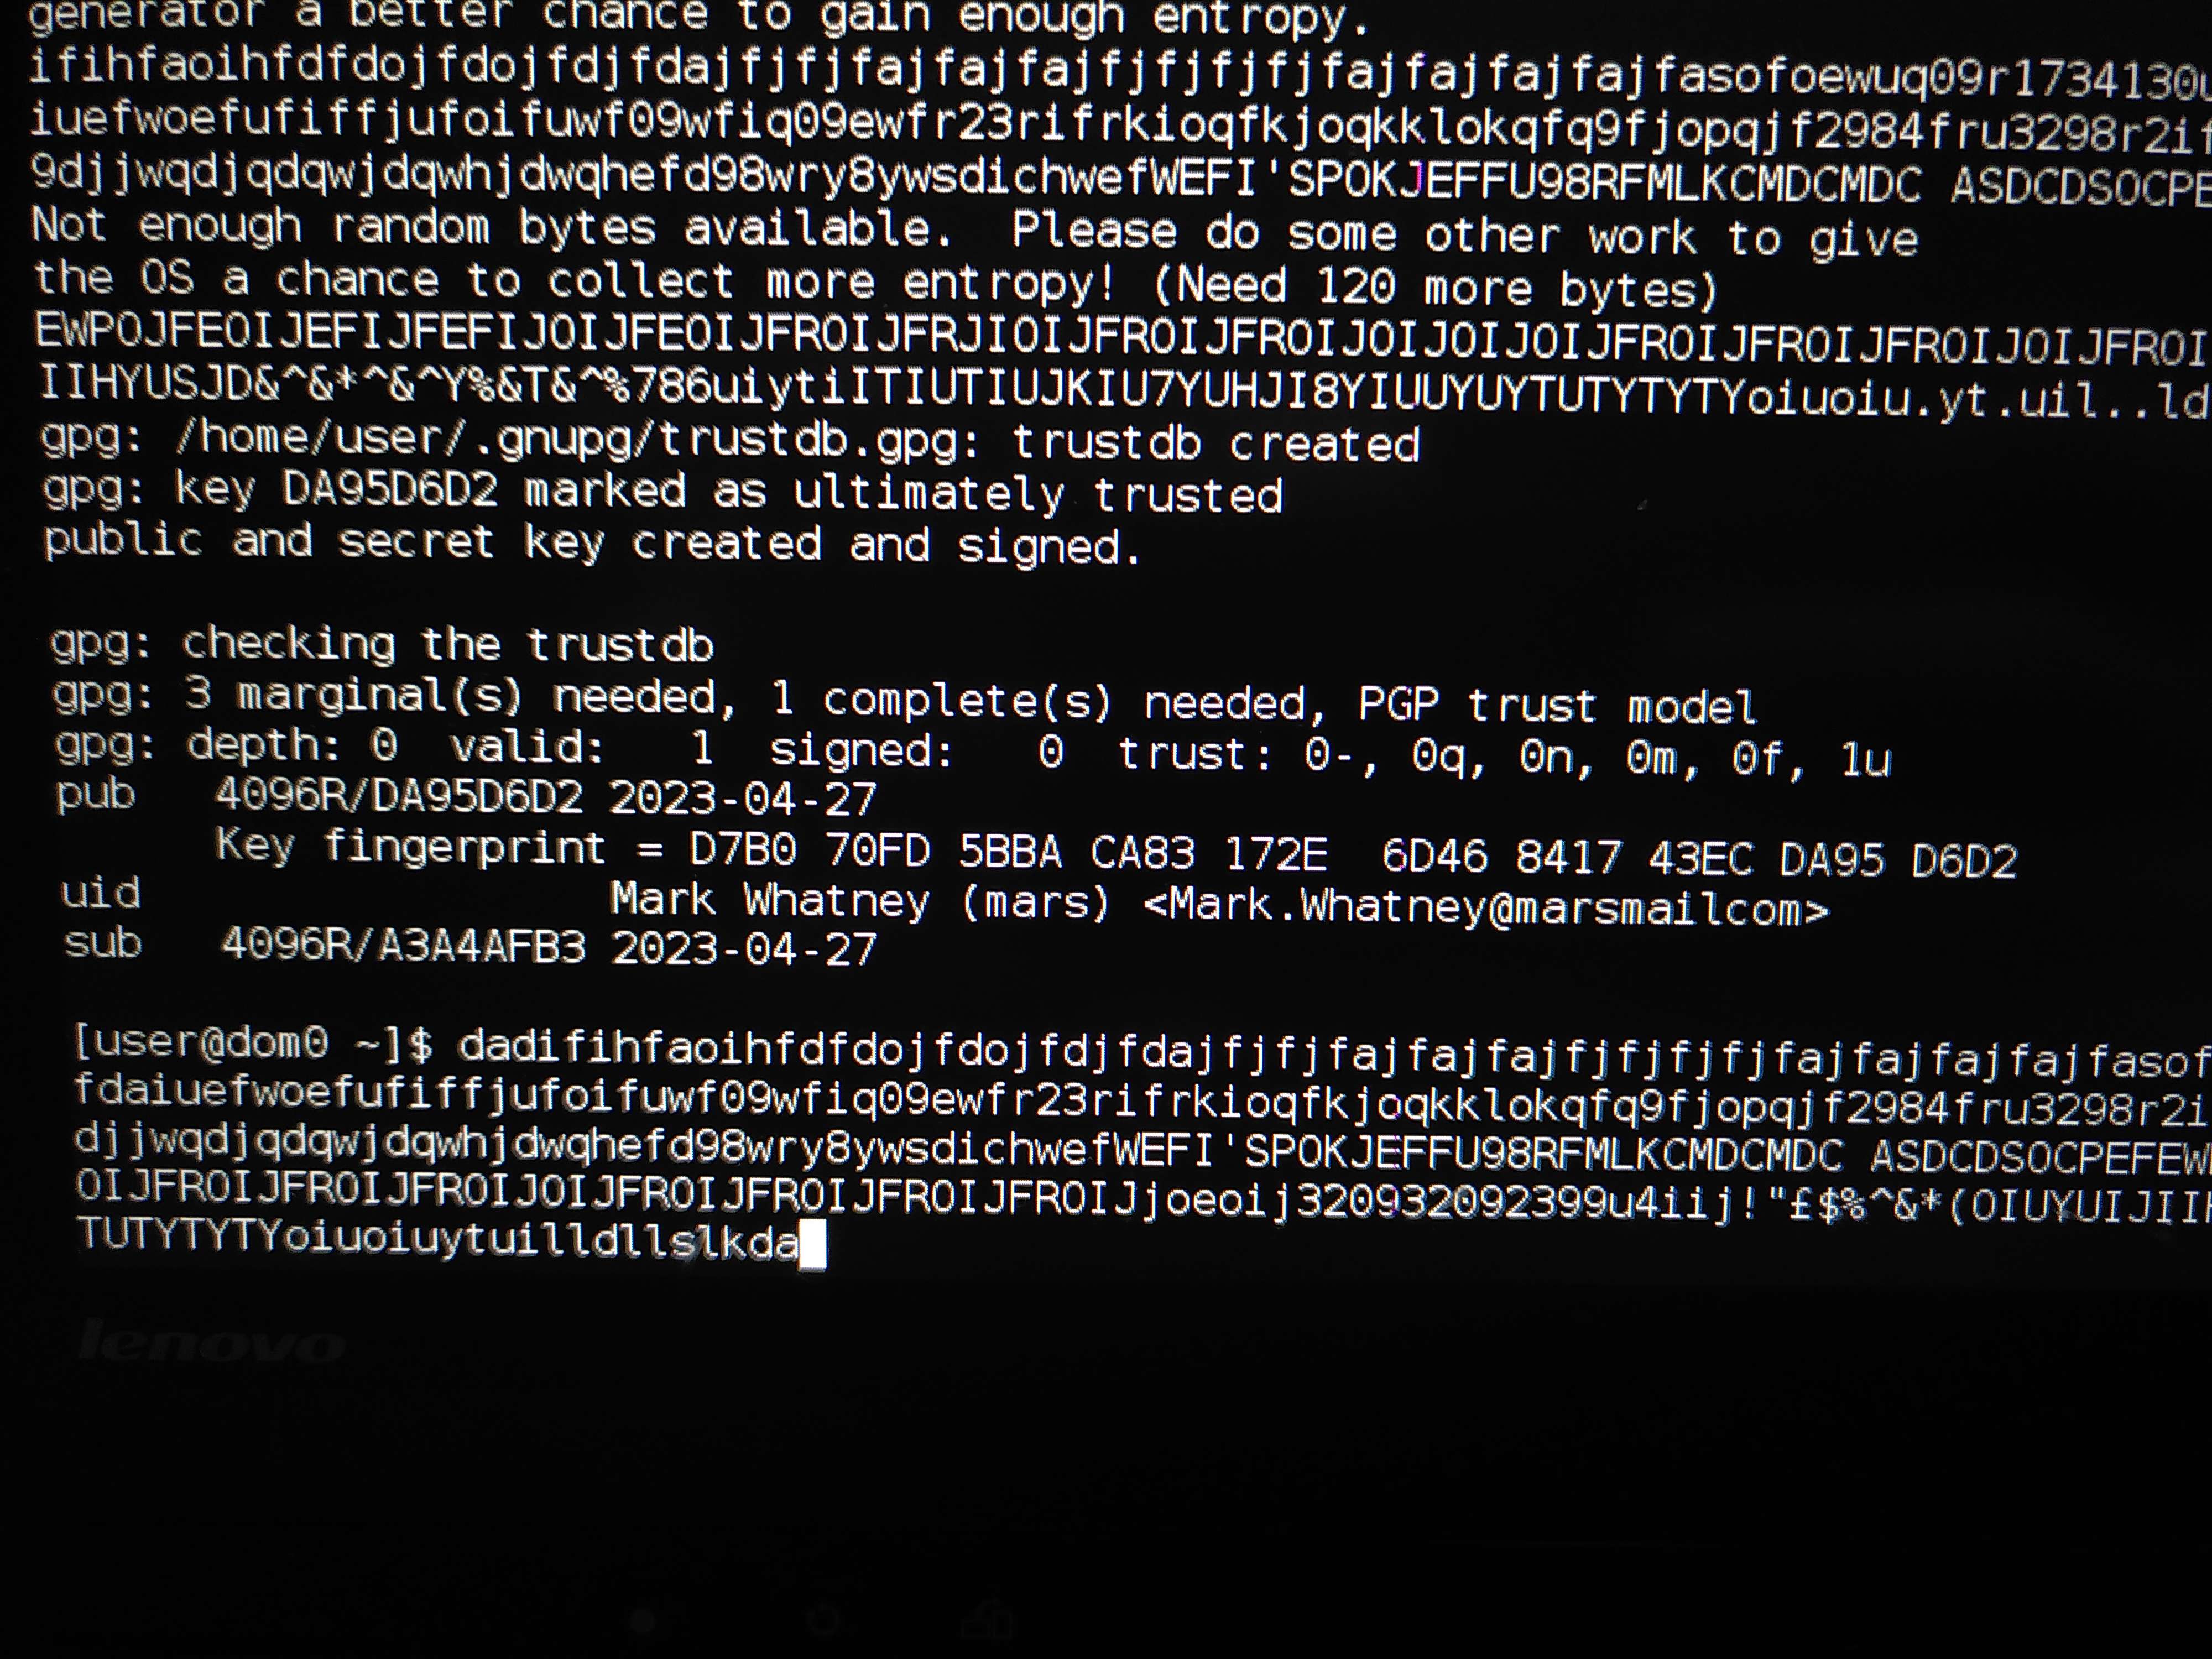
figure 17- PGP key output
PGP keys tend to look like this
-----BEGIN PGP PUBLIC KEY BLOCK-----
Version: GnuPG v1
mQINBFhNDOsBEACzwJJVsMo7sIiLhvCsLx2n+DVHzw1trM/C8Yao8EmWdDYe3ei9
mXRqSudbD6S4KvJfm+ZeOlEQ6gGoG2q3aFYASRgcK7WDhs+jwG42EA+j2oIpU/EO
8EQXTmTn8T+LQT84JZ5KkiZZp2CqLU8RVszfkKEj1oX/sO5watxNQur4fbk9FiCA
1MjHMYir1g==
=TV04
-----END PGP PUBLIC KEY BLOCK-----
Now to use these keys tails users can use kelopatra and whonix users can use GNU privacy guard
this respective programs handle everything you need such as importing a public key,encrypting messages,verifying pgp keys to prove they are correct, decrypting messages and signing messages with a pgp key to prove you sent it.
If you ever need to send or receive money only ever use monero(XMR) since if don't properly it can't be traced back. One golden rule (if you don't own you don't trust it)
only use Monero GUI/CLI Wallet from the official website.
keeping it completely separate from my own life
pretty simple don't mention anything about anything about the pc to anyone and don't mention anything about your self to anyone when your using the device.
Im extremely dyslexic and autistic, due to this my way of speaking and writing stand out compared to others because I speak in a very specific broken English manor, but it could also help since a -non-native English speaker may also speak broken English, so if I simply did not use colloquialism but kept the broken English, it could be used as a form of nature obfuscation, which is could be a positive from a Opsec point of view.
so in my case watching what I say and how I say it is critical, including avoiding colloquialism. As they can be a major indicator of age,race,gender and location.
conclusion
now you should have a reasonably secure device free from most propriety software and tracking, unfortunately the one thing we can't fix is that fact that people are idiots and make mistakes so just be careful and I take no responsibility for any stupid ideas you come up with.
Also neat fact about this its all one simple html/css web page perfect for saving offline by right clicking and selecting save page as, perfect for offline reading or not leaving a trail
figure 18- firefox right click menu
Reflection
Honestly I wanted to do a big project like this for ages but never had a reason or a way to justify spending the money on all of this, all told this project cost about £100 with the laptop and the raspberry pi costing the most, admittedly I could have done it a little cheaper but, I already had the pi from a few years ago and the flashing equipment from my previous post on this page.
I always right and show the mistakes I make through the project, to give me a more realistic view of how a project like this goes. But honestly this was quite smooth besides me trying to read/flash the management engine instead of the bios chip, then forgetting the VGA bios.
All in all can't complain happy with the way it turned out surprisingly this whole thing only took about two weeks to a month due to a mix of personal stuff,finishing uni work. But you could easily do this project in a weekend.
Links
DMN bible(its from a dread mirror because Dread is currently getting DDOS'd and I couldn't get I2P to work)
httpbiblemeowimkh3utujmhm6oh2oeb3ubjw2lpgeq3lahrfr2l6ev6zgyd.onionbibleaboutbefore-you-start
extreme privacy: https://inteltechniques.com/book7a.html
whonix wiki: https://www.whonix.org/wiki/Tips_on_Remaining_Anonymous
libreboot website: https://libreboot.org/
If you have any questions or want to contact me below
Please use links below if you would like to contact me.